Build an Automatic Bean Sprouter
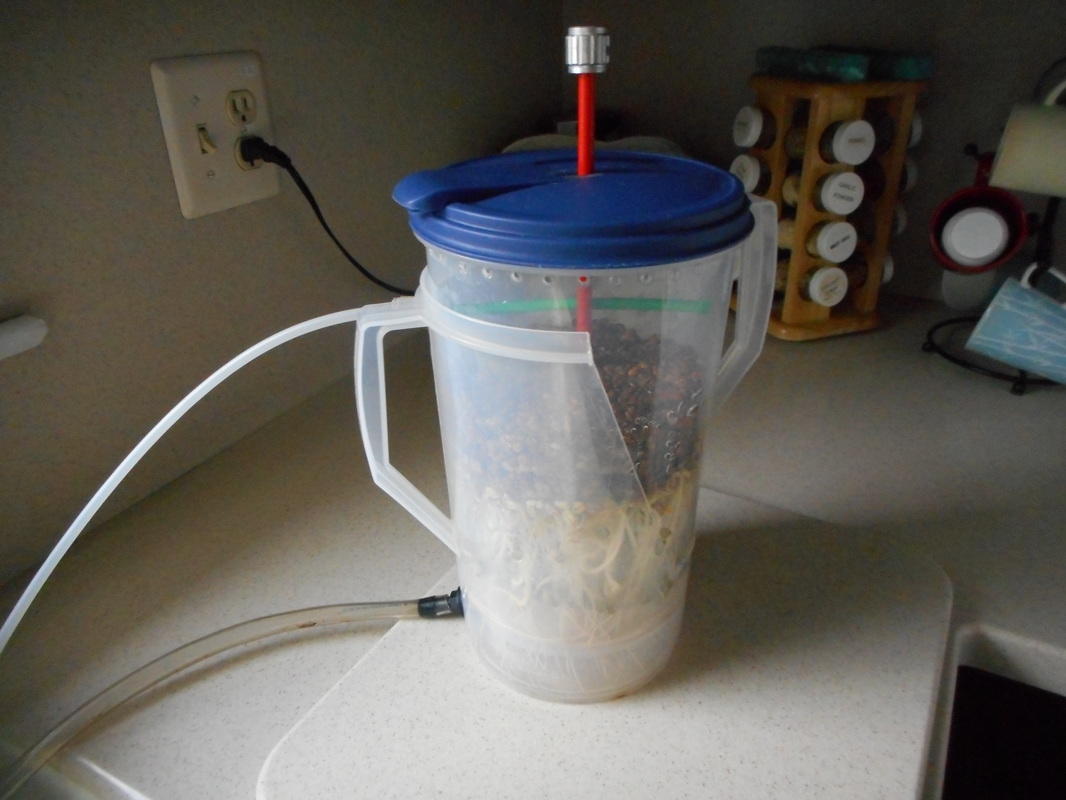
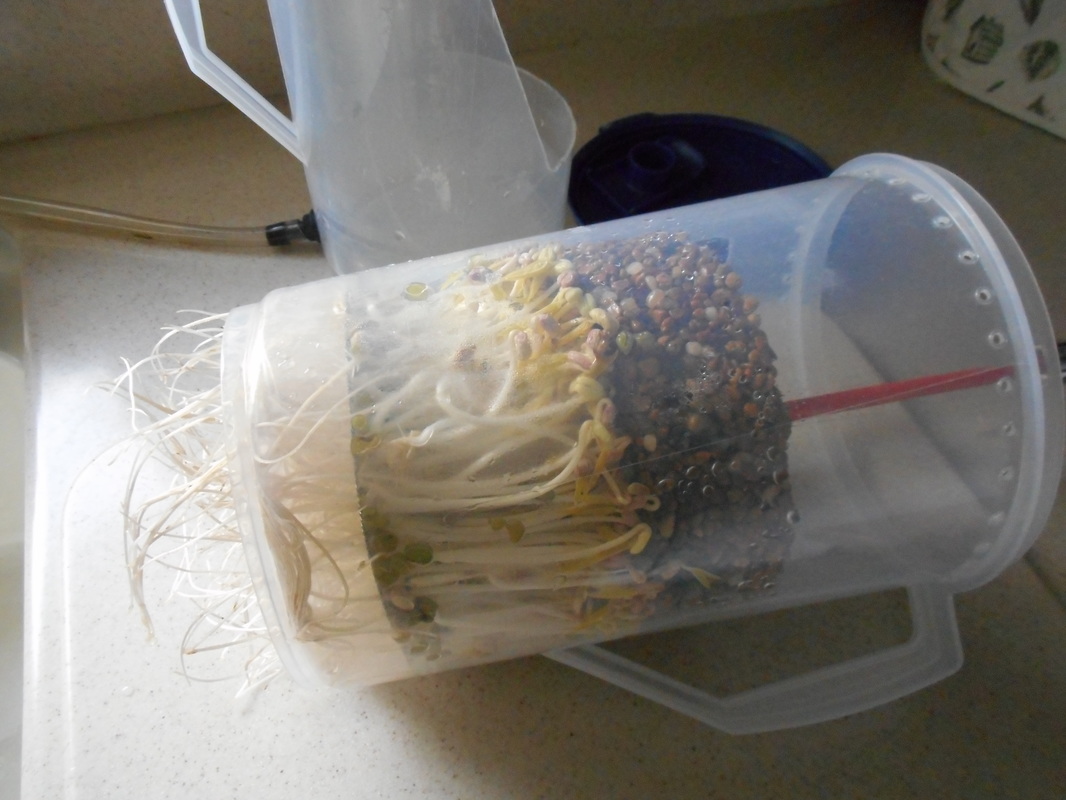
Automatic Bean Sprouter-Ready to Harvest
"Our daily paper would surprise us if it carried an ad: `Wanted, a vegetable that will grow in any climate, rivals meat in nutritional value, matures in three to five days, may be planted any day in the year, requires neither soil nor sunshine, rivals tomatoes in vitamin C, has no waste, can be cooked with as little fuel and as quickly as a pork chop.' The Chinese discovered this vegetable centuries ago in sprouted soy beans. Today they are an important food for many millions." --------Clive McCay, Cornell University 1943---------- Introduction: This Bean Sprouter is a simplified and improved version of my Automatic Sprouter that has been in continuous use since 2011. The inspiration for this design comes from “The Sprouting Book” by Ann Wigmore. This design incorporates all of what I've learned about sprouting beans. Existing commercial home sprouters don't provide pressure for the growing thick bean sprouts, or a simple way to trim away the root hairs. This sprouter is made up of an upper Growing Chamber nested into a lower Plumbing Chamber. This design allows the Growing Chamber to be quickly inserted and removed without the need to mess around with the plumbing. Once set up, the Plumbing Chamber can be left connected to the water supply and drain. The resulting bean sprouts are straight, tall, fat and happy. The fine root hairs grow naturally downward, through the screen. Most of the root hairs can easily be cut away when you harvest the sprouts. Rinse water is supplied by the programmable water valve timer connected to a garden hose outlet. It is programmed to supplies 2 min of flow every 4 hrs. A garden hose adapter connects a 1/4 inch polyethylene tubing to the sprouter through a flow control ball valve. You can operate multiple sprouter by simply adding a tee and ball valve for each sprouter. The outer Plumbing Chamber is a modified 1 gallon Sterilite or Rubbermaid plastic pitcher. The sides are cut to allow the Growing Chamber to tilt into the Plumbing Chamber. A drain fitting is placed at the bottom of the Plumbing Chamber. House water is plumbed into the top of the chamber through a bulkhead feed-through union. A 5” perforated tube directs the water downward onto a porous weight. Water diffuses through porous weight rinsing the beans sitting on the screen. The inner Growing Chamber is made of an identical 1 gallon plastic pitcher. There is a slot cut in the side of the chamber at the height of the water supply feed-through. The bottom of Growing Chamber is perforated to allow water to drain. Four 1" threaded nylon spacers are fixed the the inside bottom of the Growing Chamber. A stainless steal screen is placed on the nylon spacers forming an air space at the bottom of the Growing Chamber. A thin layer of beans is placed on the screen (3 Tbs dry beans). Never more than two beans deep. When the sprouts hit the weight, they encounter downward pressure from the weight, encouraging them to bulk up. They will get strong enough to push up the weight. 
Porous Weight
The porous weight is made by combining 2 lb of 1/8” to 1/4” washed crushed stone with just enough clear epoxy to thinly coat the stones. It's important that epoxy does not run down the stones and clog the spaces between stones. Cut a 20” length of 1/4” fiberglass rod. Drill a small hole near the end of the rod and insert a 3-4” cross piece of plastic (I used a coffee stirrer). This will prevent rod from pulling out of the stone weight. Drill a 1/4” hole in the center of the pitcher cover. Spray the inside of the Sterilite gallon pitcher with non-stick cooking spray. This is a mold release agent for the weight when the epoxy sets. Mix equal parts of epoxy and hardener to make 2 oz (6 Tbs) in a paper cup. Place the 2 lbs of crushed stones in a 1 gal zip lock bag. Add small amounts of epoxy to the bag and mix thoroughly. Add just enough epoxy to just coat each stone, but no more. You will need to mix a long time to distribute the epoxy evenly. Pour a 1/2 inch layer of coated stones into the bottom of the pitcher. Tamp the stones down to level them. Be sure to to fill the corners. Insert the 1/4” rod, cross piece down, and center it on the stones. While holding the fiberglass rod upright pour in the rest of the coated stones. Tamp them down to level. Be sure to pack the stones around the rod and into the corners. Install the cover onto the pitcher to support the rod to keep centered and vertical, until the epoxy sets. Allow the weight to set at room temperature for 24 hrs. This rod will keep the porous weight level when the beans start to push up. After 24 hrs, lightly tap the outside of the pitcher to loosen the stone weight , and carefully lift it out by the handle. Wash the oil out of the pitcher and weight with hot water and dish washing liquid. |
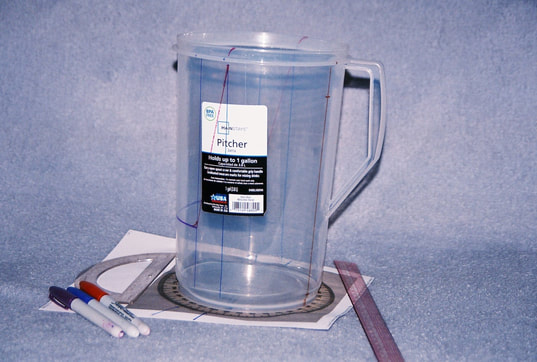
Plumbing Chamber Construction:
The lower chamber provides a spray of rinse water in at the top, and a drain at the bottom. Water is sprayed down from a short piece of perforated poly tubing.
Use a fine tip felt tip pen to draw a vertical line on the outside of the chamber 25 degrees clockwise from the middle of the handle (top view). Make a dot 1 1/8” down from the top of the chamber. Use this dot as the center of a 5/8 ” hole for the bulkhead feed through. Always work in a well ventilated area. The fumes from the melted plastic are toxic. Mark a second center 3/4” up from the bottom of the vertical line. Drill a 1/2” hole, be sure that the plastic drain fitting nut clears the bottom corner of the chamber.
Draw 4 vertical lines at 100, 120, 260, and 280 degrees. Draw a horizontal line 4 1/4" above the bottom, between the 120 and 270 degree lines. Use a flexible ruler to draw a line from the junction at 120 degrees to the top of the 100 degree line. Do the same on the other side. Draw a line from the junction at 260 degrees to the top of the 280 degree line. Use a hot blade to cut away the section of the pitcher. Clean up the edges of the cut with a sharp knife. You can flame polish the edge with a propane torch. Clean the felt pen lines with alcohol.
Install the bulkhead feed thorough fitting into the 5/8" hole. Install the bulkhead hose barb fitting at the bottom of the chamber with the rubber seal on the inside.
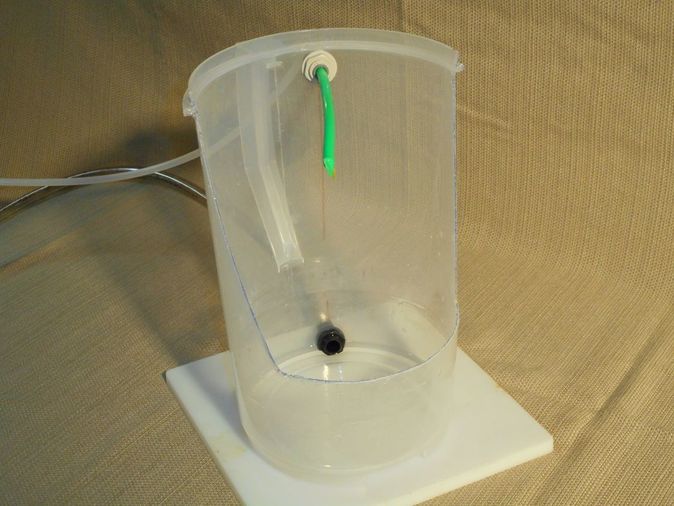
Completed Sterilite Plumbing Chamber
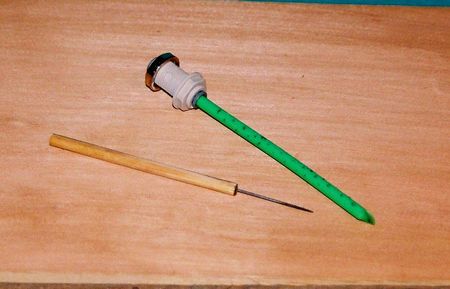
Water Supply Tube:
Heat the end of a length of 1/4” polyethylene tubing to soften the plastic. Squeeze the tip of the poly with a pair of pliers, fusing it closed. Hold it closed until it cools. Use a candle to heat a needle to melt an array of holes in the bottom 20 degrees of the poly tubing. The holes should be only 4” from the capped end. This will distribute the supply water evenly onto the porous weight without to much water dribbling down the side walls. Cut the poly off at 5” from the capped end. Insert the tube into the inside feed-through fitting. Rotate the tube so that the holes are facing down. Heat and bend the tube horizontally 5 degrees or so. This will avoid a collision with the center rod. Mark the top of the tubing with a felt tip to make alignment easier.
Heat the end of a length of 1/4” polyethylene tubing to soften the plastic. Squeeze the tip of the poly with a pair of pliers, fusing it closed. Hold it closed until it cools. Use a candle to heat a needle to melt an array of holes in the bottom 20 degrees of the poly tubing. The holes should be only 4” from the capped end. This will distribute the supply water evenly onto the porous weight without to much water dribbling down the side walls. Cut the poly off at 5” from the capped end. Insert the tube into the inside feed-through fitting. Rotate the tube so that the holes are facing down. Heat and bend the tube horizontally 5 degrees or so. This will avoid a collision with the center rod. Mark the top of the tubing with a felt tip to make alignment easier.
Growing Chamber and Cover Construction:
Use a felt tip pen to mark the top rim of the second pitcher 155 degrees clockwise from the center of the handle. Draw a vertical line from the mark to the base of the pitcher. Mark a center 3 1/4” down from the top. This should be the hole center of the bulkhead fitting in the Plumbing Chamber when they are nested together. You can temporarily remove the feed through union on the plumbing chamber to confirm the correct position of the center. Make another mark down 5 1/4”. Drill a 1 1/2” hole in the side of the pitcher. This will allow clearance for the water supply feed-through. Cut a 1” wide slot down from the hole to the 5 1/4” mark. This slot will allow the water supply tubing to slip into the chamber. Use the round tip soldering iron to punch vent holes just below the outside ridge of the chamber. Space them about 1/2” apart. Use the hot iron to make holes every 1/4” on the the bottom of the chamber, and a 1” hole in the center. This will provided good drainage. and be Place four 1" spacers in the bottom of the chamber. These spacers will support the screen, the beans, and the porous weight. For the Sterilite Pitcher, remove the hinged cover on the cover. File down the two plastic bumps on each side of pour cover about half height. Cut a 1/4” slot from the center hole to the pour spout opening. Insert a screen disk into the Plumbing Chamber. Insert the porous weight and put the cover on the chamber. Cut the fiberglass rod off at a length that will allow 1" to extend above the cover. This will allow the sprouts to start growing against the pressure of the 2 lb weight.
Fit the Growing Chamber into the Plumbing Chamber. There should be a 2” air space between the between the chambers. Install the four threaded nylon spacers into the bottom of the chamber, using nylon screws.Place the stainless steel screen on top of the spacers.
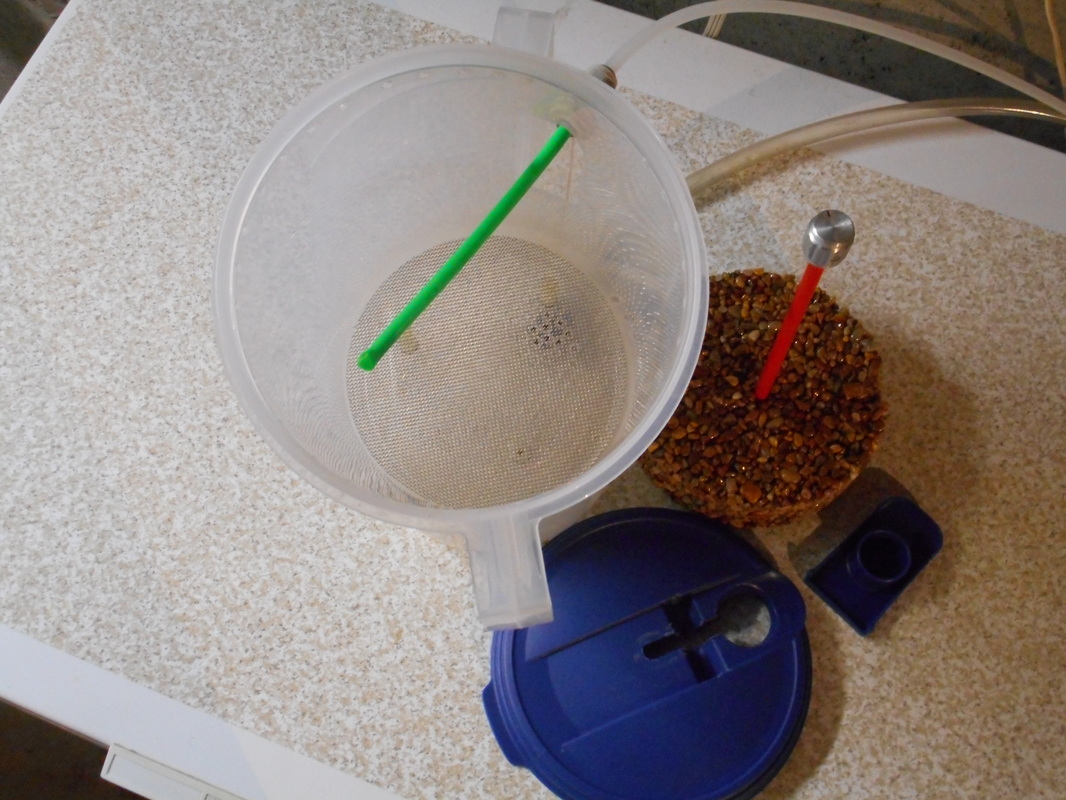
Sterilite Growing Chamber with Cover
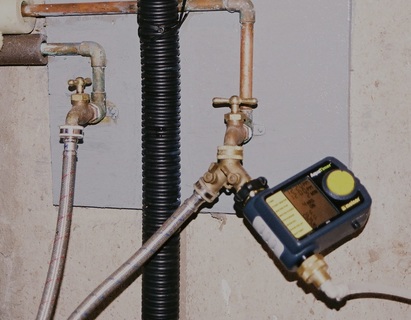
Programmable Water Supply:
Water is supplied from a Garden Hose Fitting. Typically available from a basement sink or washer cold water tap. Install a garden hose splitter with a valve for each leg. Next a battery powered programmable garden hose timer is installed. It should turn on the water for 2 min every 4 hrs. An inline valve is installed near the sprouter to regulate the flow.
Water is supplied from a Garden Hose Fitting. Typically available from a basement sink or washer cold water tap. Install a garden hose splitter with a valve for each leg. Next a battery powered programmable garden hose timer is installed. It should turn on the water for 2 min every 4 hrs. An inline valve is installed near the sprouter to regulate the flow.
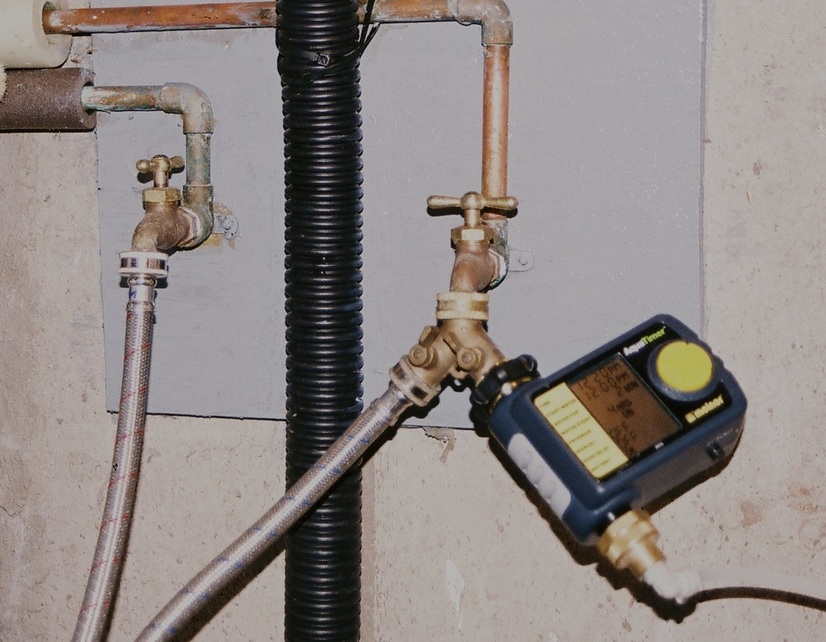
Programmable Water Supply
Use:
Connect the water supply and drain tubing. Place a 5 1/4” disk onto the nylon spacers at the bottom of the Growing Chamber. Place a thin layer of pre-soaked organic sprouting beans on top of the screen. Spread out the beans evenly. Don't allow more than a 2 bean thickness. Install the porous weight and the cover. Tilt the Growing Chamber into the Plumbing Chamber. Carefully align the slot in the Growing Chamber with the Water Supply tube. The tube should be inside the Growing Chamber with the needle holes facing down.
Keep the sprouter in the dark. Don't block the air. Start the Water Timer program to spritz the beans for 2 min. every 4 hrs. That's it. Just watch and wait until harvest time. When the porous weight pushed up to within an inch of the spray tube its time to harvest.
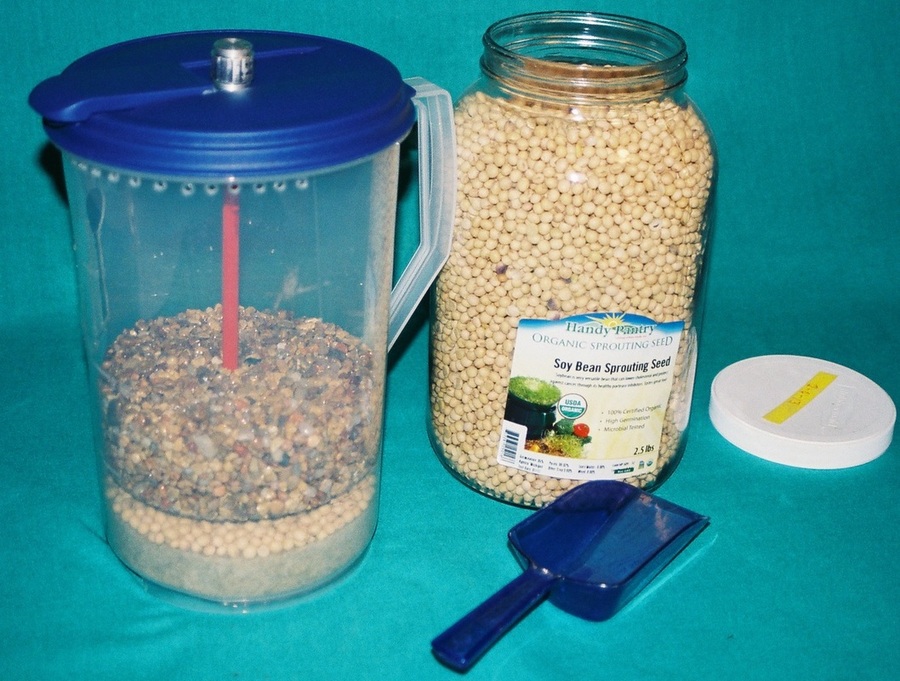
Sprouter Loaded and Ready
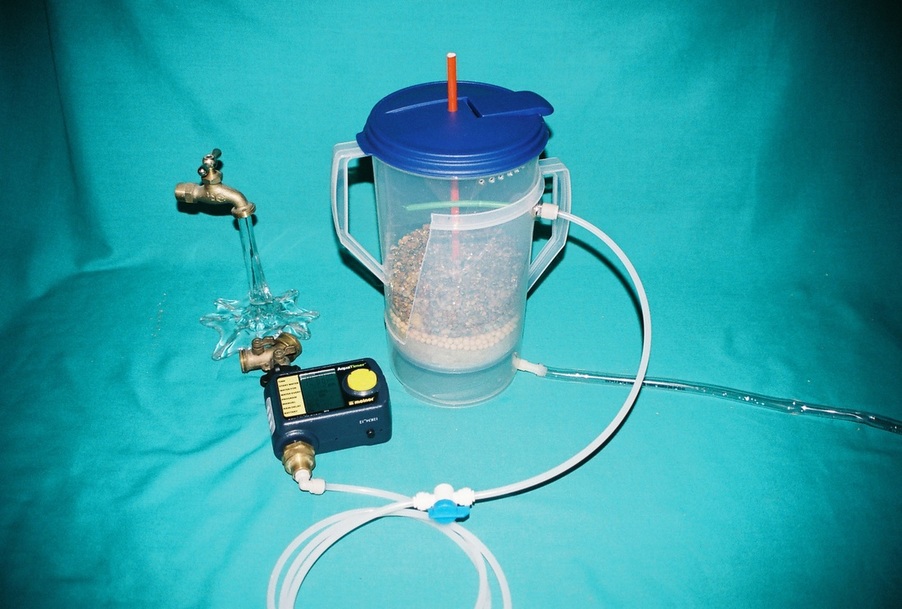
Sprouter Setup
Harvest
The sprouts should reach 2-3 “ length in 4 to 8 days, depending on the type of bean and the temperature. They won't be as fat as commercialy produced bean sprouts because they inject ethayline gas into the growing chamber. I don't.
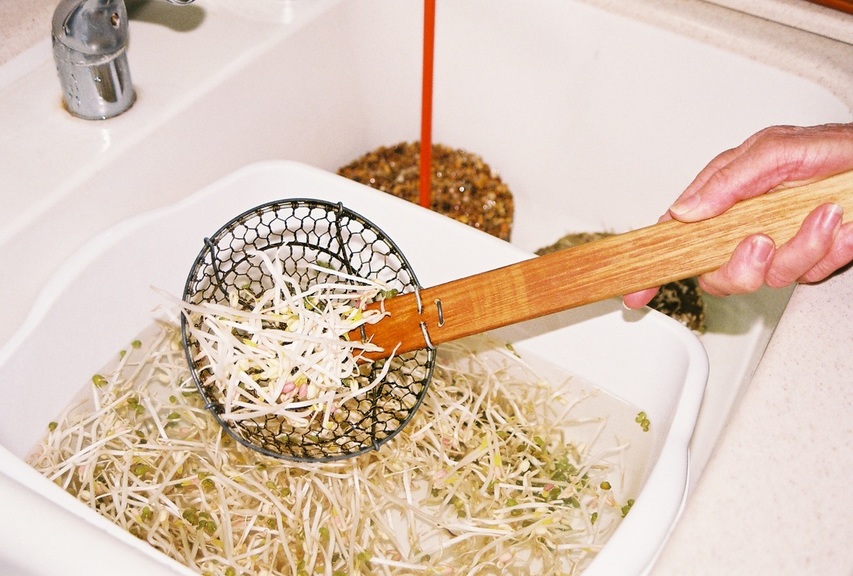
Close the ball valve and tilt out the Growing Chamber. Remove the cover and porous weight. Push the screen up from the bottom of the chamber. It will push out the solid plug of densely packed bean sprouts attached to the screen. Use a long sharp knife to separate the screen from the sprouts. Most of the root ends will be cut off with the with the screen. Use water bath to separate the sprouts from the seed coats. It is very important to clean a sanitize the sprouter. I use a 10% bleach solution in a spray bottle. Spray the sprouter with the bleach solution and flush everything with clean water. Allow it to air dry before storage.
The sprouts should reach 2-3 “ length in 4 to 8 days, depending on the type of bean and the temperature. They won't be as fat as commercialy produced bean sprouts because they inject ethayline gas into the growing chamber. I don't.
Close the ball valve and tilt out the Growing Chamber. Remove the cover and porous weight. Push the screen up from the bottom of the chamber. It will push out the solid plug of densely packed bean sprouts attached to the screen. Use a long sharp knife to separate the screen from the sprouts. Most of the root ends will be cut off with the with the screen. Use water bath to separate the sprouts from the seed coats. It is very important to clean a sanitize the sprouter. I use a 10% bleach solution in a spray bottle. Spray the sprouter with the bleach solution and flush everything with clean water. Allow it to air dry before storage.
Finished Sprouts in the Sterilite Growing Chamber
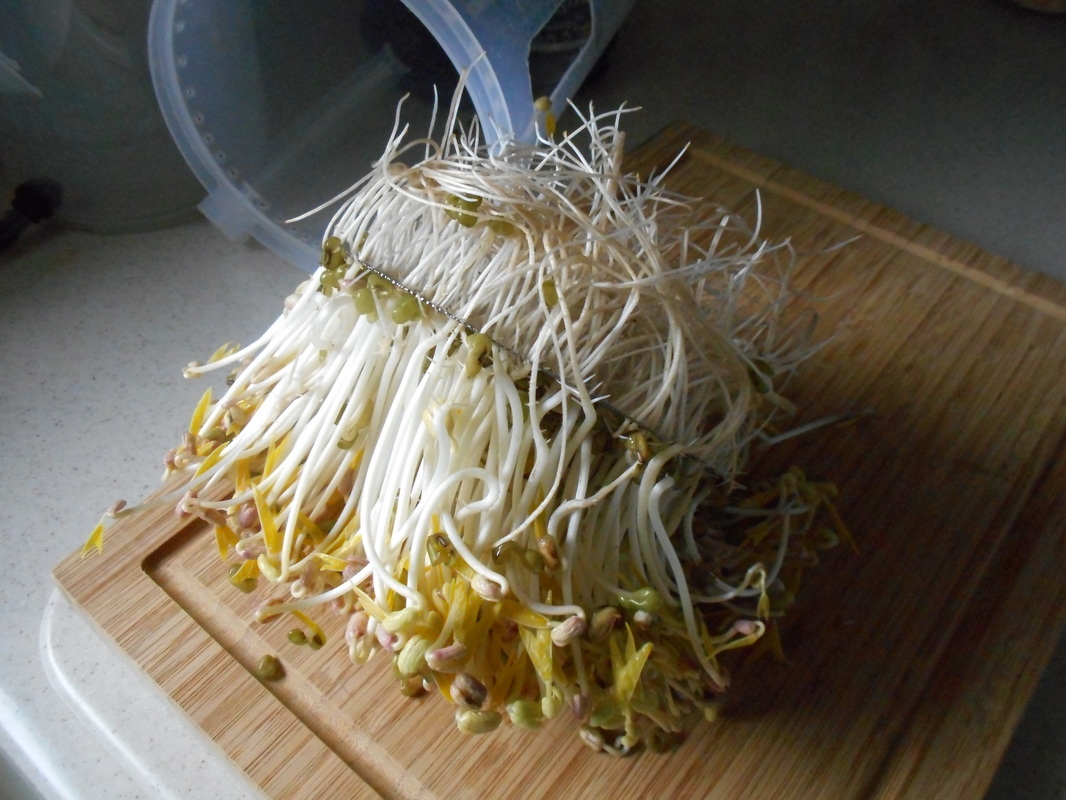
Plug of Sprouts, Screen and Roots
Materials
2 ea Sterilite 1 Gal Round Pitcher----------------------- S&S Wordlwide $5.76
or 2ea Rubbermaid 1 Gal round Pitcher-----------------Wallmart $8.00
25 ft Polyethyline Tubibng 1/4" O.D. ---------------------mcmaster.com $3.00
Ball Valve push to connect 1/4 x 1/4---------------------- airwaterice.com $4.95
Union, Through Wall push to connect 1/4 x 1/4--------mcmaster.com $4.00
Bulkhead Drain, 3/8" hose barb, PHBBF-3/8-------------jehmco.com $1.98
Tubing, Clear Vinal, P3/8x5/8-------------------------------jehmco.com $0.40/ft
Melnor Aqua Timer Valve ,#3015-------------------------Home Depot $30.00
Adaptor, garden hose female to 1/4" push to connect ---airwaterice.com $4.00
Crushed Stone, aquarium, 1/8 to 1/4" --------------------petco.com $3.20
Epoxy Resin, clear----------------------------------------------amazon.com $11.14
Rod, fiberglass, 1/4"---------------------------------------------mcmaster.com $4.80
Stainless steel wire cloth disk, 5 1/2" dia-----------------mcmaster.com $14.00
3 1" threaded nylon spacers with nylon screws---------true value hardware $2.00
Fat Bean Sorouts
2/12/17 modified
Automatic Tray Sprouter
Introduction
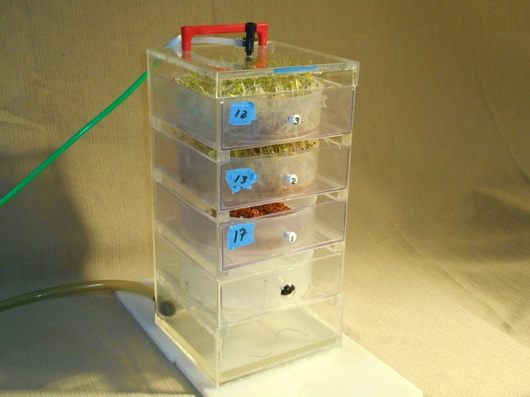
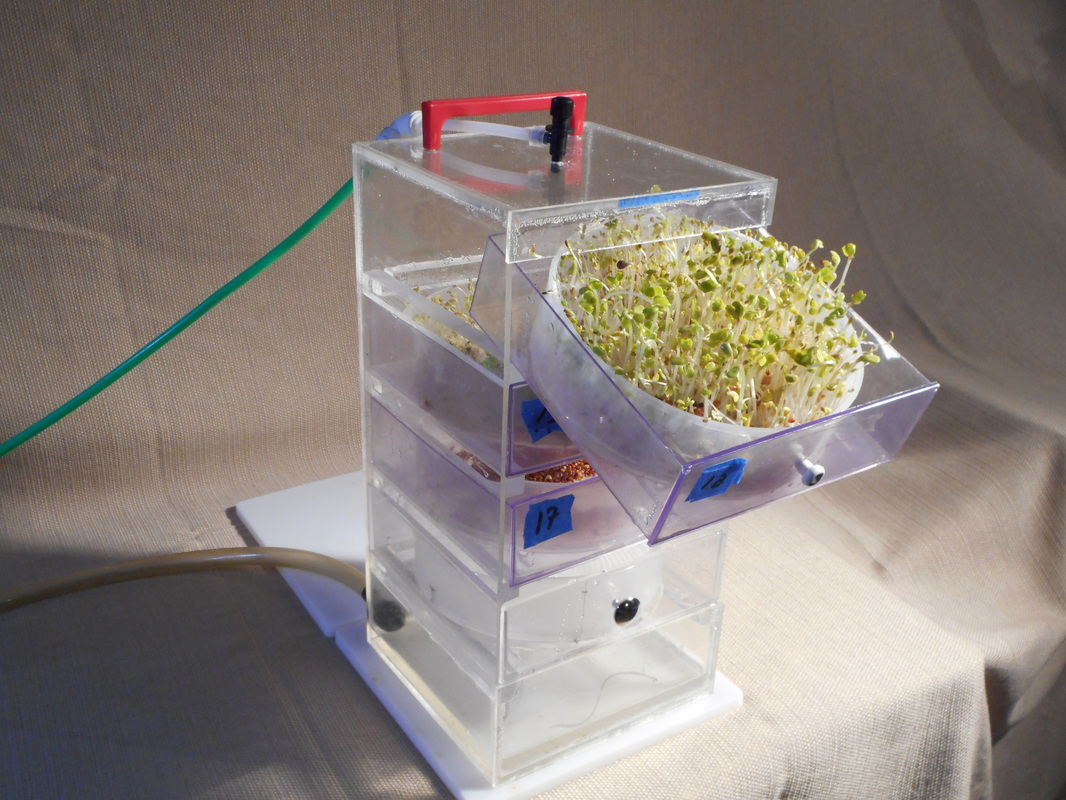
-Growing your leafy green sprouts requires light, water, air and warmth. This sprouter is constructed around two commercial Victorio VKP-1014, 4 Tray Seed Sprouters, and two Inter Design Vanity Organizer. Each tray is inserted into a 6 1/4” clear plastic drawer. The drawers are positioned in the boxes . The bottom of the lower box forms the drain reservoir An other vanity organizer is stacked on top, and contains the water supply flow valve on top. A drain hole connects the two boxes. You can load the pre-soaked seeds on Monday and go away 'till Friday. There is no need to be around, the sprouter takes care of itself. Or you can set up a daily supply by starting a tray or two every day.
Water Supply
Fresh water is supplied for 2 min. every 4 hrs. A Melnor Aqua Timer is connected to a garden hose fitting on the cold water tap using a garden hose splitter. Water is connected to the top of the sprouter box through a shutoff valve and an adjustable flow valve. Adjust the flow rate to approximately 2 cups per min. Water will slowly drip down through the stack of drawers, flooding each tray in turn with water. A bulkhead drain fitting is placed at the bottom of the catch basin to drain away the used water. Water is not reused. This avoids any accumulation of bacteria.
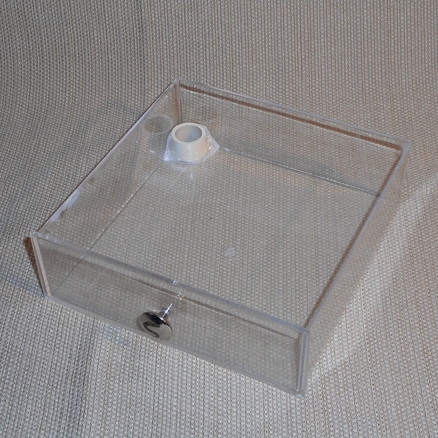
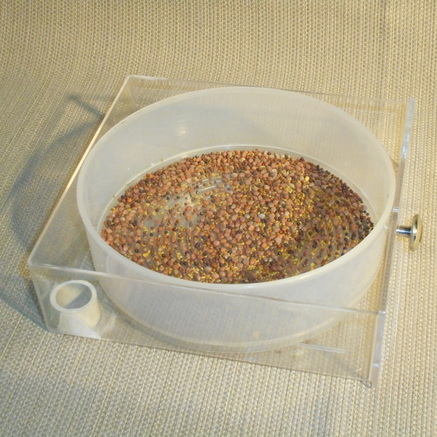
Soaker Drawer
The bottom drawer of the sprouter can be replaced by a soaker drawer. It contains a stand pipe drain in the back corner that will leave 3/4” of water in the drawer. When the seeds have soaked an appropriate time (depends on the seed), the round seed tray can be moved into a sprouting drawer.
|
|
Soaker Drawer
Box Construction
The Sprouter is made from two Stackable Vanity Organizers. The bottom box has a hose drain fitting and the front of the bottom drawer position is blocked off with a piece of 1/8" acrylic sheet, making a water tight reservoir to catch the draining water. I used SIGRIP Acrylic Plastic Cement. The top box has the water flow valve mounted in the top. The top drawer is notched to allow the valve to fit. There is a water drain hole between the two boxes.
The Sprouter is made from two Stackable Vanity Organizers. The bottom box has a hose drain fitting and the front of the bottom drawer position is blocked off with a piece of 1/8" acrylic sheet, making a water tight reservoir to catch the draining water. I used SIGRIP Acrylic Plastic Cement. The top box has the water flow valve mounted in the top. The top drawer is notched to allow the valve to fit. There is a water drain hole between the two boxes.
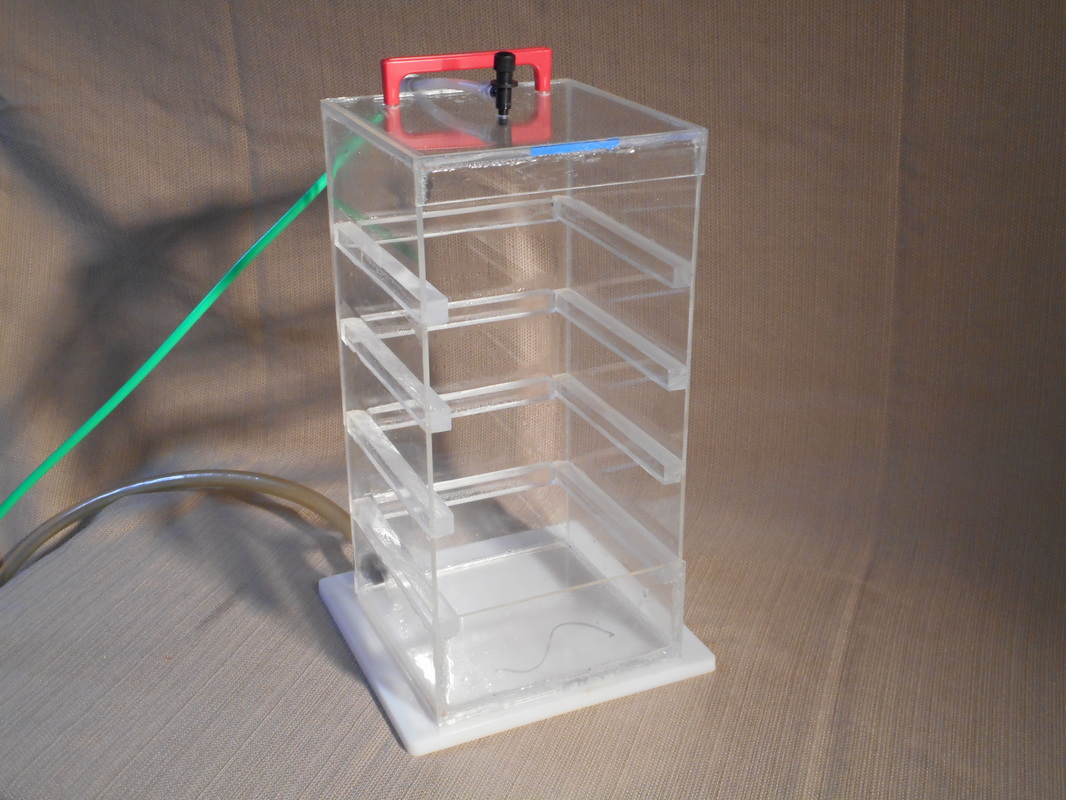
Finished Box
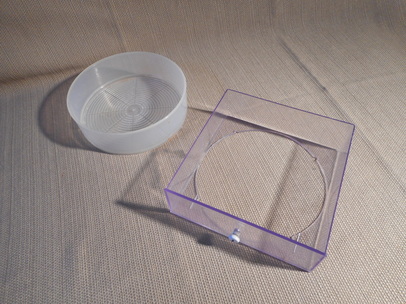
Sprouter Drawer Construction
A 6” hole is cut in the bottom center of the drawers. Make a holding jig from scrap lumber to firmly hold the drawer and provide wood backing to drill into. I used a 6" hole saw. Trim the cut edges with a sharp knife. Fit a Victorio tray into the drawer.

|
|
Soker Drawer
The lowest drawer in the sprouter can be replaced with a seed soaker drawer. This drawer has a stand pipe drain in the back corner, that will leave 3/4" of water in the drawer. A Victorio tray is fitted into the drawer for the appropiate
soak time. Then the round tray can be moved up to a sprouting drawer.
Using the Sprouter
You can grow one large batch of sprouts by loading all four drawers with per-soaked seeds, or you can load a drawer every few days to ensure a steady supply of fresh sprouts. Place the seeds into the soaker drawer for one or two flush cycles. Then move the Victorio tray to a sprouter drawer and relocate it to a higher drawer position. That's it. You will have sprouts in a few days. When you harvest the sprouts be sure to thoroughly clean a sanitize the sprouter drawer and tray, using a 10% bleach mixture. You can soak the stained Victorio Tray in the Soaker Drawer with 2 tbs of white vinegar added to the standing water. Use a needle to clean out the small holes in the tray. You don't want your next crop to be Salmonella do you? See Safe Food Handling.
Finished Batch of Sprouts-borccoli-alfafa-radish (BAR)
Tools
Table saw with fine tooth blade for plastics
Router with table
Router Straight and Flush Trim bits
Eazypower Isomax 6” hole saw , Amazon.com $23
Material
1/8” Clear Acrylic sheet, 24x24",usplastics.com #44301 $ 20
3/16” by 3/4" clear acrylic extrusion, mcmaster.com, 6 ft, # $12
Solvent Adhesive, SCIGRIP 16, Ellsworth.com, #16 5oz $8
2 Inter Design 3 Drawer Vanity Organizer, Amazon.com, $28
2 Victorio 4 Tray Sprouter VKP1410,beprepared.com $28
1/4” O.D. polyethaline tubing, mcmaster.com $3
3/8” I.D. Drain Tubing, mcmaster.com, 5231K6 $0.44/ft
Plastic Ball Valve, ¼ x ¼ press to connect ,airwaterice.com $5
Bulkhead Drain Fitting, 3/8 hose, jehmco.com, PHBBF-3/8 $2
Adjustable flow valve, rt angle, petco.com $1
Garden Hose Y splitter, Home Depot $5
7/29/16
